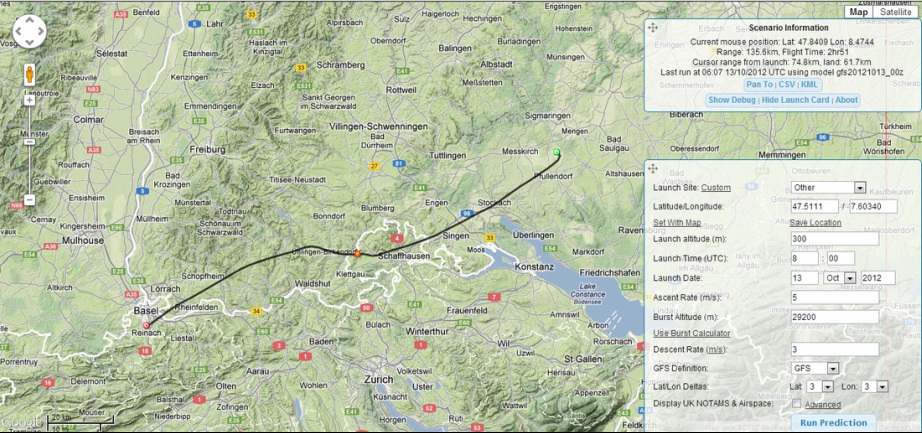
CUSF Landing Predictor 2.0
My weather balloon was launched on 13 October, 2012 at 9:32 a.m. The reason I chose this day and this time was because of the flight path prediction of the balloon predicted by the CUSF Landing Predictor. In this predictor, one has to enter the latitude and longitude of the launch site, launch altitude, launch date, launch time, ascent rate, burst altitude and descent rate all calculated using the CUSF Balloon Burst Calculator and the Parachute Descent Calculator. Once these fields are filled in, the predictor shows the flight path on a map either in map view or the satellite view. This is extremely useful as you get to know the direction and distance of the landing site from the launch site. When the flight is viewed in satellite view, one can also see whether the landing area does not contain any lakes, rivers, mountains, forests, highways and other areas where possible health and safety issues can be caused. When I checked the flight path for 13 October at 9:00 a.m., it showed that the balloon would land in Germany near a place called Pfullendorf. The pictures below show the predicted flight path - the first image shows it in map view and the second shows it in satellite view.

Procedure
First, the balloon was filled using the helium cylinder. It took us roughly 45 minutes to do this because the pressure at which the gas was let out was kept low just to ensure that no damage was caused to the balloon. All the 3 m^3 gas was used.
Note: It is better if the balloon is filled in an enclosed area. If the balloon is let gone off, then you can stop it from flying away.
After the balloon was filled it was tied with several string knots and cable binders. The balloon was tied to the helium cylinder which would prevent it from flying away.
Next, the lid of the box was attached to the parachute using the long 15 feet twine.Several knots were tied on each side to ensure that the box would be held tight.
Next, all the equipment was turned on. A command code was sent to the GPS Tracker via SMS telling it activate automatic tracking and send coordinates every 15 minutes. The GPS replied with an SMS saying "Scan = on." The data logger was then programmed to take 6000 readings for each parameter - humidity, temperature and dew point. at 5 second intervals. This gave the data logger an operation time of 8 hours 20 minutes. After this, the Canon A800 was turned on with CHDK and programmed to take 1440 photos at 10 second intervals. This gave the camera an operation time of 4 hours although the battery would die out after an hour or two. The camera started taking pictures every 10 seconds and finally, I turned on the camcorder - the simultaneous blinking of the blue LED provided a signal that video recording had started.
All the equipment were placed in their respective positions. Each instrument was placed in its own separate compartment. A small body warmer was placed in each of these compartments and a large body warmer was placed in the middle where no equipment was placed. Cotton was inserted all over the box to provide a soft padding for the equipment. Some of the equipment like the GPS Tracker and the data logger were taped to the box to ensure that they would not move out of their positions.
The box was glued using the UHU por and then taped together using masking tape.
Note :When taping, you need to ensure that areas where the equipment such as camera lenses are pointing out are not taped.
At last, the parachute was attached to the balloon using the short 6 feet twine. Several knots were tied to the balloon and to the loop on the parachute. After this was done, the balloon was ready for launch. But I waited for another SMS from the GPS confirming the location. Unfortunately, the tracker did not transmit GPS coordinates, instead, a 8 digit code was sent which meant that GSM mobile network was used to determine the position of the tracker.
The balloon was then launched at precisely 9:32 a.m. and everything was cleared on site.


